Converting the Physical into Digital
Analog to digital conversion is a critical part of electronics today. Everything from a digital scale at home to the most complex medical devices and satellites convert analog signals into digital representations. Today, I’m going to explain how one of the most popular ways to do this works, and how to take the digital output from an MCP3221 and convert it back into its analog, decimal representation.
My previous post discussed a simple circuit to detect the battery voltage and feed it into an analog to digital converter. For reference, here is what a simple battery voltage detection circuit could look like:

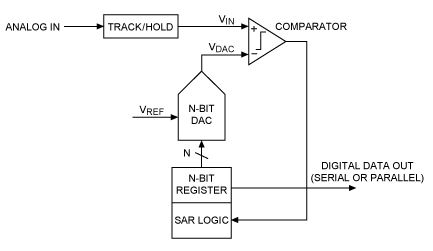
The MCP3221 ADC employs an extremely common architecture called a successive approximation register (SAR). An SAR ADC does exactly what its name states; it approximates the input voltage by successively comparing it to a known reference voltage, and determining if the measured voltage is higher or lower than this known reference voltage. The output is either a logic high or low based on the result of this comparison. This output is stored in a register that can then be read by your microcontroller/processor. This conversion is repeated as many times as there are bits of resolution; that is, for a 12-bit ADC like the MCP3221, this conversion takes place 12 times per input sampling before placing the result into the register to be read. Because of this, the internal circuitry could be operating at much higher frequencies than the ADC sampling rate.
Here is the block diagram of how the SAR algorithm works:
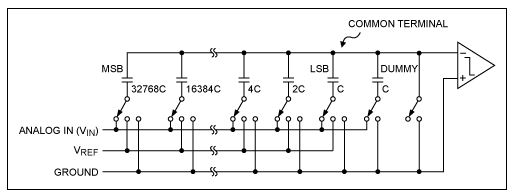
And here is the simplified internal circuitry for a 12-bit SAR ADC Notice the binary weighing of the capacitors; ideally each capacitor is exactly twice the value of the next smaller capacitor to give the highest accuracy possible:
Analog Successive Approximation
To begin, the analog input is sampled by switching the bottom plate of the capacitor network to ANALOG IN, while connecting the top plate to ground. This charges the capacitors and stores a binary scaled amount of energy on each capacitor. This can be seen by the binary weight of each successive capacitor in the example photo; from the MSB of 2^15(32,768) down to LSB of 2^0 (1). After sampling the input voltage, the common terminal is disconnected from ground, while the bottom plate is the switched to ground. This forces the common terminal to a voltage equal to -Vin.
The system then begins the binary searching, as the free terminal of the MSB is set to Vref while the remaining capacitors are still connected to ground. Using a simple binary summation and our knowledge of electronics, we see that this creates the capacitor equivalent of a resistor divider network, with Vcommon = -Vin + 0.5(Vref). We can see this is true by performing a simple nodal analysis on the top plate, and realizing that 2^11 == (2^10 + 2^9 + 2^8….+ 2^1 + 2^0) and therefore is 1/2 of the total capacitance.
This voltage is fed into the comparator, and will produce a logic high if Vin > 0.5(Vref), and a logic low if Vin < 0.5(Vin). If the result of the comparison is a logic high, the bottom plate of the MSB stays connected to Vref, otherwise it is connected back to ground. This result is stored in a register until the entire capacitor network has been checked, and the result can then be read by the microcontroller. The exact value of the voltage can then produce by using the successive approximation register and placing the logic highs and lows with their binary weight.
Making Sense of the Data
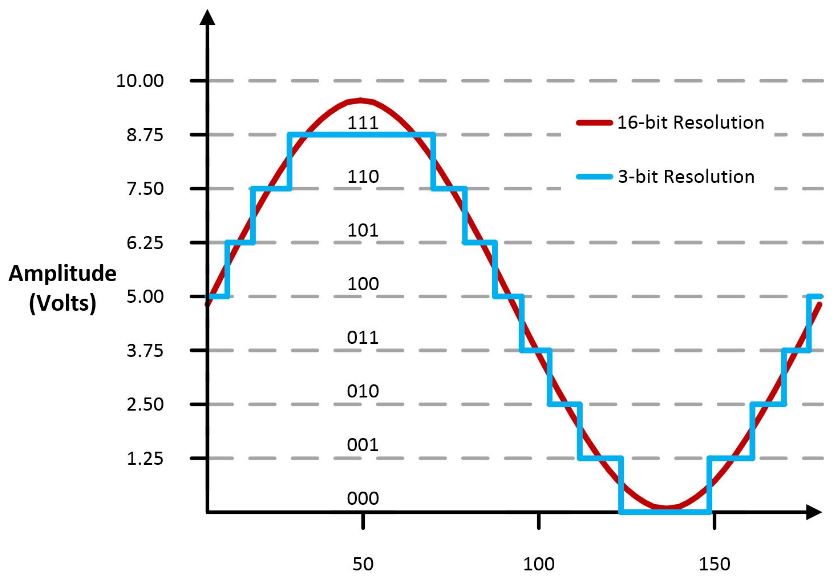
Now that we know how the device performs its analog successive approximation and stores the result, what happens when we want to make sense of this data? Lets say we have a 4-bit ADC and after sampling, the register has ‘1011’ as the stored result of our most recent conversion. This represents a decimal value of 1(2^3) + 0(2^2) + 1(2^1) + 1(2^0) = 8+0+2+1 = 9, but this is not our measured voltage!! The digital output produced by our MCP3221 is a function of the input signal and our supply voltage, VDD.
The least significant bit value is adjusted based on our supply voltage following the equation LSB SIZE = (VDD / 2^n) where ‘n’ is the number of bits on our ADC. Since I am supplying the 12-bit ADC with 5V, my LSB SIZE for the MCP3221 is 5V/(4096) = 0.001220703125. We can then perform some simple mathematics and get our true value for the measured voltage. Let’s see this in action…
Say our 12-bit ADC stored a value of all logic high (i.e. ‘1111 1111 1111 1111’). We expect this value to be equal to VDD, which in my case is 5V. We measured our LSB value above to be 0.001220703125. For brevity sake, I will call this value ‘Z’. To convert this digital value into its analog representation, we just plug in our values like so:
Z(2^15) + Z(2^14) + … + Z(2^1) + Z(2^0) = 2.5 + 1.25 + ….0.002441406 + 0.001220703125 = 4.998779V. Wait a second, why isn’t this exactly 5V as we predicted? In fact, this value is exactly ONE LSB Value away from being exactly 5V. This is where our DUMMY capacitor comes into play! Refer to the circuitry above, and you’ll see that next to our LSB capacitor of value ‘C’, we have another capacitor of the same value ‘C’ next to it. This capacitor is needed for our binary summation to work!
4.998779 + 0.001220703125 = 5.
We’ve done it! We can now convert an analog voltage into a digital representation using an analog successive approximation, and we now know how to convert THAT digital representation BACK into its analog value! How cool is that?? I hope this helped you understand how we can convert analog samples to and from the digital domain using this surprisingly simple, but very powerful, type of analog to digital converter.